Resident Evil 7 : Biohazard

Resident Evil 7: Biohazard is a survival horror video game developed and published by Capcom. The game was released worldwide for Microsoft Windows, PlayStation 4, and Xbox One in January 2017, with the PlayStation 4 version having support for thePlayStation VR headset. It is the eleventh entry in the Resident Evil series, and the first main series installment to be played from afirst-person perspective. Resident Evil 7 was announced during Sony's presentation at E3 2016 in June. A playable gameplay teaser titled Beginning Hour was released to the PlayStation Store the same day.
The story follows Ethan Winters in the search for his wife Mia, which leads him to a derelict plantation, home to the Baker family. Ethan makes use of various weapons and tools in the fight against the Baker family and creatures known as the "Molded". Healing herbs are used in the event of injury and puzzles may be solved to further the story. Instead of being action-oriented, the survival horror element present in previous installments took priority. Thus, it was decided that a first-person perspective be included. It was developed in the RE Engine, with over half of the assets created with photogrammetry.
3 Facts, Secrets & Easter Eggs You Totally Missed
1. ...And The 1996 Original
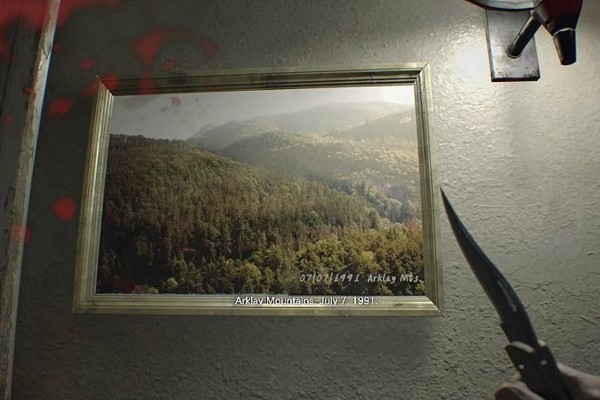
Whilst everything relating to the visuals of the Spencer Mansion tends to be the most iconic parts of 1996's Resident Evil, it's easy to forget the location itself was in the Arklay Mountains.
Discoverable in the foyer of the new Baker mansion - providing you know what you're looking at - the family appear to have a shot of the mountainous region, dated 1991. An idyllic look into the area before all the zombified chaos kicked off, perhaps?
The image predates the events of the first game, but a similar shot was used in the original Resident Evil movie, where Paul W.S. Anderson included the fleeting glimpse of the environment as his own easter egg to fans.
2. Two Low-Key Characters Make An Appearance
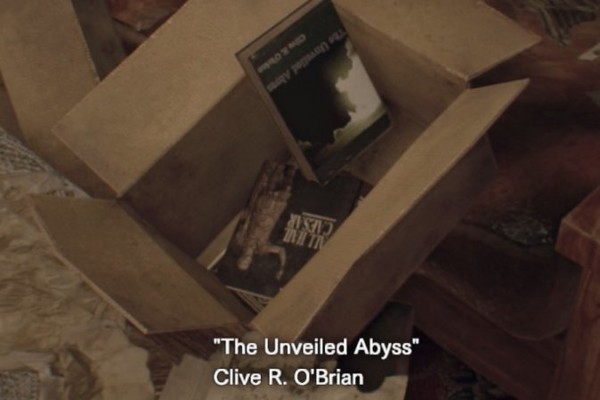
If you're yet to see which main character shows up towards the end of the game, I'm not about to spoil it, as there are far more subtle continuations of the canon hidden throughout the Baker's mansion regardless.
The first is Clive R. O'Brian, a main character from the first RE: Revelations spin-off who after surviving the events of that game, appears to have gone onto author a book detailing his accounts, named 'The Unveiled Abyss'.
Second is Alyssa Ashcroft, a reporter from RE: Outbreak who can be found as credit for a newspaper story, readable in the mansion's foyer. Fingers crossed we see these characters providing more excellent environmental storytelling in the upcoming DLC.
3. Raccoon City Is Still Canon

For the longest time it appeared as though RE7 may simply be a one-off; a new attempt to breathe life into the series under the proviso that if its first-person setup didn't work, or feel particularly worthwhile, Capcom could back out again.
Alas, in the game, there are many confirmations that RE7 is just as much a part of the mythology as every other main instalment, as the above article on the "nightmare of Raccoon City" proves.
There's even the added fact that as 'the Raccoon City incident' from RE2 was in 1998 and this magazine cites '16 years' later as when this piece was written (in 2014), it matches up to timeframe of when RE7 protagonist Ethan's wife went missing, being the game is set in 2017.
Don't worry if that wasn't clear, it'll all make sense after you finish the story...
Resident Evil 7 Tips
- Like any good survival horror game, Resident Evil 7 is about atmosphere and environment. Pay careful attention to the world around you. There are items and clues hidden throughout the Baker family estate that will help you along the way.
- Conservation is key to survival. Conserve your ammunition and healing items. You won’t find many of these items throughout the game, so make sure you don’t waste them on silly things.
- Watch your back. You never know what is lurking in the shadows, just waiting to jump out at you. Always be aware of what is going on around you, no matter which way you are looking.
- Everything is useful. No matter what you find along the way, don’t discount it. You never know when those seemingly useless items might be the answer to a hard to crack puzzle.
- Be ready. There’s no telling what is going to jump out at you when you enter a new room. Always be ready to fight back or run.
- Sometimes running is the only answer. Like many survival horror games, you’re going to find yourself coming face to face with unspeakable things. Sometimes, the best thing to do is to turn and run. Learning when you should stay and when you should run is extremely important if you wish to survive and escape the Baker’s estate.
Resident Evil 7 - Antique Coin Locations
Resident Evil 7 has plenty of goodies strewn around its levels, but Antique Coins are one item players will want to pay special attention to. These special coins can actually be used to purchase upgrades throughout the game, which can come in very handy when dealing with the monstrosities that players will encounter. In this article we’ll teach you the location of every Antique Coin in Resident Evil 7, and show you how to get the Pelicans in Your Pocket trophy/achievement.
How to Use Antique Coins
As we stated above, Antique Coins are special because of their ability to be used to purchase upgrades. These upgrades can be found inside of bird cages that appear throughout the game. Players will find their first bird cages shortly after exiting the Main House, inside Zoe’s Camper.
Due to the story-driven nature of Resident Evil 7, this guide will contain some story spoilers. For those who wish to play the game without any spoilers, please be wary of continuing through this guide, as it may spoil some of the moments included in the game’s story. It should also be noted that every map location we use will be outlined in bold so that you can easily compare the name to your location on the map.
All Antique Coins in Easy and Normal
Antique Coin 1
The first Antique Coin can be found in Guest House 1F, inside of a locked drawer in the Kitchen area. Unfortunately, there aren’t any lockpicks around this area at the start, but you can grab this coin another way. Load up the Derelict House Footage VHS Tape and play through it. At the start, while still outside, look around the back of the area for a lockpick. Once you head inside the Guest House, use the lockpick on the drawer, and then finish the tape. After watching the tape, return to the Kitchen to find the drawer unlocked and an Antique Coin inside.

Antique Coin 2
The second Antique Coin can be found after the family dinner sequence. Once you move into the crawlspace underneath Main House 1F, when trying to escape Jack. Crawl through the area towards the exit and look for this Antique Coin on the edge of a lawnmower. Grab it before continuing forward.

Antique Coin 3
Players can find the third Antique Coin within the Main Hall of Main House 1F. The coin can be found inside of a drawer in the upper left hand area of the room, when looking at your map. The dresser holding the coin is just before you get to the old sofa and the door that requires three dog heads to open.

Antique Coin 4
The next Antique Coin is found up in the Recreation Room of Main House 2F. Head up the steps in the Main Hall and make your way to the Recreation Room. You’ll find the Antique Coin above the pool table, close to the locked door that leads to Grandma’s Room.

Antique Coin 5
While on the second floor of the Main House, make your way over to the Bathroom and look in the toilet inside. You’ll find another Antique Coin there, waiting to be collected.

Antique Coin 6
The sixth Antique Coin is found inside of the Drawing Room of Main House 1F. This is the room with the deer replica and the whiteboard. The Antique Coin can be found resting in the ashtray in this room.

Antique Coin 7
This seventh Antique Coin is found in the Processing Area that players must traverse in the Main House basement. The coin is found inside the same area as the Scorpion Key, which also happens to be the room where you get the Processing Area Map. Grab the map, then turn to the left and take note of the wooden pallet leaning against the wall. Crouch down here and grab the Antique Coin in the small cubby behind the pallet.

Antique Coin 8
The next Antique Coin is found after players have made their way into the yard with Zoe’s Camper. This can only be accomplished after fighting Jack for the second time, and finding all of the dog heads that open the back door. Head outside and down the stairs, taking a right at the bottom. Take another right, and move up towards the house’s lower level. There’s a coin hidden inside a potted plant in this area. Search until you find it.

Antique Coin 9
Head inside Zoe’s Camper and look around for the bird cages that you can use the Antique Coins at. There is one marker “Magnum”. Look down in front of this bird cage to find another Antique Coin.

Antique Coin 10
Players will need to continue into the Old House to find the next Antique Coin. As part of the story you will crouch through a small hole and catch a brief glimpse of Ethan’s wife, Mia. The hallway that leads to this room has a trolley in it. Look for the coin on top of the trolley.
Antique Coin 11
This next Antique Coin is found in the same area as the Crow Key. Look in the outhouse that is furthest north. The Antique Coin can be found on top of the toilet.
Antique Coin 12
After you open up the Crow Door on Old House 2F, continue to a dead end, where you find out that you need a lantern to continue. There is a set of drawers that can be looted in this room. This Antique Coin can be found inside of the topmost drawer.
Antique Coin 13
Players can find the thirteenth Antique Coin inside of Testing Area 1F. At the end of a long corridor you will find a small storage room, just before you go into the barn. The room is booby trapped, so shoot the wire out with your gun to make it safe. Look in the drawer of the green desk inside to find this Antique Coin.
Antique Coin 14
After the fight in the barn, you’ll reach an area on Testing Area 2F that has a button, which opens a staircase that leads back down to Testing Area 1F. Look for a set of chest-high shelves in this room, and grab the Antique Coin off the shelf in the corner.
Antique Coin 15
This Antique Coin can be found on Wrecked Ship 1F, as you climb through the ship. You’ll be granted a brief flashback to a couple of workers working on a duct. Once the flashback ends, the duct will be open, and you can drop into a hole that allows you to go one of two directions. Head left to continue, but head right and you’ll find this Antique Coin at a dead end.
Antique Coin 16
The next Antique Coin can also be found on Wrecked Ship 1F. While progressing through the story you’ll come to a dead body, and be able to drop into the water. If you look around, you will spot a ladder. The Antique Coin is to the left of this ladder, in the water.
Antique Coin 17
The second to last Antique Coin found in Easy and Normal mode can be found in Wrecked Ship 3F. The coin is hidden inside of a massive red box, which just so happens to be locked. Head back down to Wrecked Ship 2F and look for the lockpick in the northern section of the map, where you will find a side room with a ladder inside. Climb up the ladder to find some ammunition and a box with the lockpick inside. Head back to the big red box and open it up to get the Antique Coin.
Antique Coin 18
The final Antique Coin in Resident Evil 7’s Easy and Normal difficulty modes can be found inside of a locked box on Wrecked Ship S2. You need Corrosive to melt through the lock on the box. Once you have the item, use it on the box to open it up and acquire this Antique Coin.
These are all the Antique Coins hidden throughout the Easy and Normal difficulty modes in Resident Evil 7. In Madhouse mode these locations vary quite a bit, and the coins will be harder to find. Unfortunately, we don’t have much information about the locations of Antique Coins in Madhouse mode.
HOW TO GET THE MAGNUM – RESIDENT EVIL 7: BIOHAZARD
There are quite a few weapons available in Resident Evil 7, some of which contain a lot of stopping power and are capable of taking out an enemy quickly, even on higher difficulties. One such powerful weapon is the 44 MAG, a magnum handgun that has an incredible kick, but can one shot most enemies if hit in the head – unlike a regular handgun which can take upwards of five shots depending on which gun and which enemy.
Thankfully, how to get the magnum is actually shown to you relatively early on in the game. After finally getting out of the main house, you’ll find a trailer in the courtyard where you can save your game and store items. All the way to the right of the room, near the television, is a birdcage with the magnum sitting inside. In order to unlock the cage, you’ll need nine of RE7’s Antique Coin collectibles. They’re scattered around the world – some out in the open and some well hidden – so you’ll need to keep your eyes open. Just grab nine through your journey and turn them in for your brand new magnum.
Do note that the magnum takes up two item slots, twice the amount of the other standard handguns. Also, ammunition for this particular gun is very rare, even when playing on Easy. If you go for it on Normal or Madhouse, make sure to only use it on the absolute strongest enemies and bosses. You can also find some ammunition for the 44 MAG through the Toilet Treasure Photo.
Resident Evil 7 - How to Get the Shotgun and M21
You can find the Resident Evil 7 shotgun fairly early in the game, but there’s no fun in blasting evil if you aren’t doing it with one of the best shotguns in the game. This article covers how to find the normal shotgun, as well as how to obtain the M21 shotgun much later in the game. The M21 shotgun is considered to be one of the best shotguns in Resident Evil 7. If you’re looking to get some extra bang for your buck, finding the M21 shotgun in Resident Evil 7 is your best bet, but you won't be able to grab this more powerful shotgun until after you find the Toy Shotgun—or Model Shotgun as it is referred to in Resident Evil 7. For now, you’ll have to make do with the normal shotgun.
The shotgun is the first strong weapon that players find in Resident Evil 7. Once you’ve made it to the main hall, you might have noticed this beauty resting in the hands of a statue across the room. If you’ve tried to pick it up, then you know that doing so causes the door behind you to slam, closing you in.
Before you can acquire the shotgun, and stop the statue from locking you in, you’re going to have to make your way into the Processing Area, which is located in the basement of the Main House. To do this, you have to first solve the Projector Room puzzle, which is also found in the Main Hall.
To solve the Projector Room puzzle, you’re going to have to find a Wooden Statuette. If you played the “Mia” tape found in the Recreation Room, then you already know how these projector doors work. If you haven’t, they aren’t that hard to complete.
Head up to the second floor of the Main House and make your way to the bathroom in the corner. Drain the bathtub inside, and pick up the Wooden Statuette. This will help you solve the Projector Room puzzle.
Head out of the bathroom, where you’ll run into an old friend. The thing that makes this part of the game so challenging, is that Jack Baker will begin to patrol the area, so you’ll need to lure him away. We did this using the other areas of the house.
Once you’re clear, return to the Main Hall and use the Wooden Statuette on the Projector. This will allow you to enter into the lower levels of the Main House.
Now it is just a matter of continuing through this area until you find the Scorpion Key in the room to the left of the Incinerator Room. The key will be sticking out of a lump of flesh. Grab it, and then head back upstairs. Jack will still be patrolling, so look out for him as you make your way up the stairs to the second floor of the house. Head back to the Recreation Room and use the Scorpion Key to enter Grandma’s room.
Inside this room you will find a Broken Shotgun. In order to solve the Shotgun puzzle, and keep the door from closing and locking you in, you must replace the Broken Shotgun where the Shotgun is. This will keep the door open while also allowing you to hold on to the Shotgun. Later on the Broken Shotgun can be replaced by a Model Shotgun, and then combined with a Repair Kit to unlock the M21 Shotgun, the strongest shotgun in the game.
Find the M21 Shotgun

To obtain the M21 shotgun, you need to collect the broken shotgun on the second floor of the main house. This nonfunctional weapon is found in Grandma’s room. You will also need to pick up the Snake Key so you can head into the attic, which also serves as Jacob’s room. Inside the attic you’ll find the model shotgun.
Once you have the model shotgun, make your way into the yard as you move toward the two sets of stairs that lead up to the main house. Between the stairs there’s a loose side panel that can be removed to find a repair kit in the box just beyond, then head back into the house. Switch the model shotgun for the broken shotgun found on the statue located on the far side of the first floor so the door opens again, then combine the repair kit with the broken shotgun to create a fully functional M21 shotgun.
Resident Evil 7 : Biohazard DLC
1. Resident Evil 7 : Biohazard DLC - Bedroom

Resident Evil 7 : Biohazard DLC
1. Resident Evil 7 : Biohazard DLC - Bedroom
When Clancy wakes up, you’ll be in Master Bedroom of the Main House, though things have changed slightly. You’ll have one hand tied to the bed, and Marguerite Baker will come in with food - wanting you to eat some of it to become part of the family. When presented, act enthusiastic until she leaves.
Grab the Spoon, and then free yourself from the restraint and get out of bed. Note that you can return to bed at any point and look nice for when Marguerite comes back - if you’re out of bed when she comes back...that won’t go so well. Check to the left to find a Lantern (you need its light to inspect other objects), and note that the crook is fastened with a cork. Then look at the vanity dresser by the door to the closet that’s locked - if you peer behind the dresser you can crouch down and spot a Knife taped to the wall. The left drawer has the note usually on the globe that related to the clock “the same time as the other clocks”. The right drawer comes out with a strong pull but doesn’t go back in (Trust me, it’s better if you don’t open it), and there’s a vase on top of the dresser you can inspect to find a Lighter.
Now look at the little altar across from the bed to find a space for three painting above it - but only one is present on the left, Untitled Painting C. You may be tempted to grab it and place it in the middle to match the shape on the wall - but let’s wait until you find all of them first. To the right is an unfinished grandfather clock that’s locked, so look to the left of the bed to find Untitled Painting B. Behind the painting you swiped are two bottles with a cork, but the spiders won’t let you near it, and the lighter isn’t enough to stop them.
While you’re here, look to right behind the green shutters to spot one of three Dead Rats and inspect it to be on your way to obtaining the Ratcatcher Achievement / Trophy.
Look on the bedside table to check out the clock, only to have the Broken Clock Hand fall off. Still, it makes for a pretty good lockpick, so use it to pick the lock on the Grandfather Clock to open up the inside where you can find Untitled Painting A. Doing this will trigger the clock to ring, startling Marguerite. You’ll have 60 seconds to make sure NOTHING looks out of place before getting back in bed. This means closing the Grandfather Clock and any drawers you opened (if you broke the drawer on the right you’re screwed), and making sure Painting B back in front of the bottles, and Painting C is back to the middle, and putting the Lantern back on its crook before getting in bed and closing the restraint. If all goes well you can fool Marguerite into thinking nothing is wrong, but if not, she’ll attack you causing damage before resetting everything and leaving again. She’ll also tighten the restraints, but you can still open them with the Spoon.
Back out of bed, put Untitled Painting B on the left, Untitled Painting C in the middle, and Untitled Painting A on the right, and it will open up the book in the middle to show a voodoo doll with a Sewing Needle embedded in it. Grab it, and make sure to grab the Paintings and put them back in their original positions (one less thing to worry about next time Marguerite shows up). The Sewing Needle makes a good clock hand, and you can now see the clock time by opening up the Grandfather Clock (5:00). Doing so will slide the bed across to reveal a locked door below the bed that needs the Snake Key. It will also loosen a note that now appears on the floor with a riddle. Unfortunately you’ll have 60 seconds to read it - as the noise from the bed will alert Marguerite. Here’s the riddle for reference:
First, death granted darkness to the man from the west.
As the man traveled on, he gave of his flesh to the four beasts of the earth. And when he arrived back in the east, he was charred black with arden joy.
As the man traveled on, he gave of his flesh to the four beasts of the earth. And when he arrived back in the east, he was charred black with arden joy.
Jump back into bed as mom comes in, only this time she has a new plate for you to try. If everything is in order she’ll leave again, letting you nab the new Fork and the Stove.
If you're looking to continue the Ratcatcher Achievement / Trophy, hold on to your stomach and poke at the stew with your Fork. Now get out of bed and inspect the stew from the side of the bed to spot the second of three Dead Rats.
The aforementioned riddle mentions three men - the men who are in each of the paintings. - and next to their slots you can see a marking for North. The man from the west, the left painting, should be Untitled Painting A (who has no eyes = darkness). The man traveling on giving his flesh means the middle painting should be Untitled Painting B (crows picking at the man’s flesh). That leaves the man in the east who is charred black to be Untitled Painting C (the man covered in flames). Place these in order and the book will open a new section, a voodoo doll holding a fork and spoon, with a leaf symbol in the middle. The Leaf symbol corresponds to one of the symbols on the lock to the Storage Closet - but what about the others? Inspect the Fork and the Spoon you have to find the other symbols, a Snake on the Fork, and an Apple on the Spoon. Set up the lock to read Snake, Leaf, Apple, and the door will unlock.
Inside the Storage Closet, you’ll find a bunch of new mysteries. The Snake Key is locked in a cage next to Shadow Puzzle with two different shadow plinths and a lightbox that doesn’t seem to be working. The back of it is taped up, and if you check a coat on a rack in the corner, you can learn that the Knife is stashed behind the dresser if you didn’t already (and also that silence might help against Marguerite). A cabinet next to it is boarded up, but your Knife can pry it loose to find Solid Fuel inside.
There last of the Dead Rats is in the Storage Closet, on top of the bookshelf next to the shadow plinths next to the upside down chair. Inspecting it should unlock the Ratcatcher Achievement / Trophy.
Before we play with the Shadow Puzzle, go back into the bedroom and combine the Solid Fuel with the Stove and place it under the spiders, and then use it with the Lighter to blaze them off. However, in the process one of the bottles breaks, alerting Marguerite and giving you just 40 seconds to grab your prize - the Corkscrew - from the bottle, take the Stove and replace it with the Painting, make sure the Storage door is closed, and hop back into bed.
Once out of bed for the last time, use the Corkscrew to unplug the cork from the Lantern holder next to the bed, and take Lantern Hook A. Now head into the Storage Closet and look for another lantern holder in the back of the room and uncork that one to where you get Lantern Hook B. Open the back of the Shadow Puzzle box with the Knife and place the Lantern inside. Now combine Lantern Hook A with Lantern Hook B to form an Iron Statuette, and use it on the plinth closest to the painting to form Medusa’s Head. Now go to the other plinth and use the Fork, and align the prongs of the fork to overlap and form the snake head. This will unlock the Snake Key - but will also alert Marguerite, and you can spy on her bursting into the room from the hole in the wall.
She's not leaving any time soon, so you'll need to think on your feet. Grab the Lantern back from the Shadow Puzzle, and equip the Knife so you are holding it out as you confront Marguerite. As long as you have the Knife out, Clancy will stab her to stun her for a brief period. That's your cue to race over to the clock and slide the bed over, and open the hatch on the floor with the Snake Key. As soon as its open, jump down and run into the basement where the tape will end.
2. Resident Evil 7 : Biohazard DLC - Nightmare

The Resident Evil 7 Nightmare DLC is a wave-based survival mode where you face off against large numbers of enemies with limited resources and traps.
Taking place in the Main House's Processing Area, you must fend off Molded and other foes by purchasing weapons from work benches using Scrap, a currency generated by Compactors. By making savvy purchases, starting new Compactors and making the best use of your limited ammo, you'll stand a good chance of surviving all five hours (or rounds).
How to beat every wave and get easy Scrap in Resident Evil 7 Nightmare DLC
Stick to the opening area and get extra compactors working for easy scrap
If you venture through to the Boiler Room, you can use a Corrosive to access the Dissection Room, where you'll find another workbench and by the Morgue another Compactor. However, ignore these areas entirely, as the time and distance of heading over compared to the three easily accessible Compactors surrounding the starter Incinerator Room doesn't make it worth your time.

Instead, stay in the corridors surrounding the Incinerator Room. In short, you'll want to do the following. After you start the Compactor in the opening Incinerator Room, you should straight away sprint to the open area to the south, just before the stairs to the Snake Door in the main story, where there is a Compactor there too. From now on, sprint between these two and collect the Scrap they produce, killing enemies as you go.
When you can afford 1,500 Scrap, then buy a Corrosive and open the Workshop room (it's the locked door out and to the left of the Incinerator Room) where there's another Compactor inside.

For the rest of the run, continue sprinting between these three Compactors to make sure you get a steady flow of Scrap, with the added benefit of constantly being on the move and avoiding enemies. And later, perhaps from round 4, you should have enough to purchase a Compactor upgrade to increase their output by 50% to get even more out of them.
Use the Knife - seriously
The best overall strategy - though one we recommend you employ after trying it with weapons for the first few goes, at least to unlock some early rewards and get a good feel for how the mode works and where enemy spawns appear - is to priortise using the Knife until sometime into round 4. While it's very weak on its own, if you purchase the two upgrades, Molded will go down in around three to five swipes at the head, saving you on a lot of ammo.
The main problem you'll face with Nightmare generally is with ammo, and its escalating cost as you progress. By using a Knife, this ensures that, apart from the bosses, you'll not only save Scrap which you can spend on upgrades, but when you do need to buy ammo, it'll won't be as expensive in later rounds. It really is a method that transforms your run (thanks to the Resident Evil sub-Reddit for the tip that started us experimenting with this method).

With the Knife, the best strategy is to sprint round the corridors, killing Molded one by one - with some luck you'll find enemies as they spawn for some easy attacks - and when in groups, make sure you keep them bunched together so you can lunge in with a swipe and back off again. Dance around Molded, attacking from the sides, and with effective blocking you'll dodge most of their attacks.
That said, you're more likely to be injured, so put that spare Scrap you're saving on Med Kits and health-related upgrades. By the time you need to switch to weapons - during bosses and around round 4 onwards - ammo and weapons should still be very cheap.
You won't win first time, but that's OK
As mentioned above, the Knife strategy is very effective, but we'd recommend playing with weapons and simply learning spawn points and the feel of the mode. The way the Rewards system works means you'll get more permanent unlockables as your score accumulates. Between that and naturally getting better, the more you play, the easier things become.
Rewards that you'll be looking out for early on are the Machine Gun Set (10,000 points), First Aid Med x3 (40,000 points), Adrenaline (100,000 points) and 44 MAG set (200,000 points). But if you're struggling, you may also want to consider...
The Circular Saw is useful if you simply want to finish
When you accumulate 300,000 points over a number of sessions - which is no mean feat and if you don't get to the later waves, so may take a while - you unlock the Circular Saw. This is a melee weapon and so, like the Knife, means you can save on purchasing ammo for most of a run. By holding it out in front of you with the left trigger then holding right trigger afterwards to start it spinning, it'll saw through pretty much anything that comes your way.
There are some problems with it; it's not cheap, coming in at 3,000 Scrap, and using it will lower your score drastically if you're aiming to unlock other items (there is a 0.01% multiplier, turning your tens of thousands of points into literally hundreds) but it's a helpful way to simply get past the later hordes of enemies and finish the mode. If you can, however, learn to play with the Knife, and you'll get the benefits of both.

Use the right weapons at the right times
Our favourite go-to weapons were the Shotgun and Machine Gun. The Shotgun is excellent at simply clearing away enemies close up, with two or so headshots are simple to pull off in a pinch, while the Machine Gun is great at a distance or in crowds, allowing you to pick off advancing enemies coming down corridors without worrying too much about accuracy. We recommend upgrading these as soon as you can, too, to increase their firepower and potency.
The Grenade Launcher is best saved for bosses but can also be useful for crowds. Also, when you unlock it as a reward, the MAG 44 is very useful for Jack's final encounter, if only to stagger him on every shot. Ignore the Burner - it's weak and puts you in a dangerous close position - as well as the Handgun, especially if you're focusing on using the Knife.
How to deal with the bosses
There are two boss types to look out for - Jack and Fat Molded - at the end of round 2 and 5, and 3 and 4 (with two Fat Molded) respectively.
For Jack, you want to run away from him, giving him the chase round the corridors, waiting until he attacks, allowing you to dodge and get a hit in while he's open. If you can manage it, a particularly good strategy is to run round the corridor so he's behind you, where he will regularly grab you and spin you round. Immediately block, and you'll repel his advance, leaving him open for an attack before you sprint away and repeat the process.
Use the Shotgun close up, Grenade Launcher rounds at a distance and when you have a breather, traps to whittle his health down (more on this below). On the final round, using MAG 44 rounds if you have them unlocked, which is great at both dealing high damage and staggering him.

As for the Fat Molded, run round the corridors and keep your distance as much as you can to avoid their vomit attacks, and so you aren't cornered and so cannot squeeze by them. Again, Grenade Launcher rounds are good, especially if other enemies are bunched up, as well as traps. They get particularly dangerous when with other enemies, but if you run round corridors, they'll naturally group together and will be contained at a distance.
Save the traps for bosses
It's tempting to use traps and more powerful weapons when overwhelmed by hordes of Molded, but since some traps can only be used once and the latter is expensive, do your best to wait until the bosses.
There are several types, but the best ones are the tripmines dotted in the corridors around the Incinerator Room, and the Turret in the more open area to the south. Both work well for either boss, and we recommend using a couple for each encounter so you always have something to help you with each fight, since explosives disappear for good once used and the Turret costing more each time you activate it.

Note that tripmines won't work instantly, so if Jack is on your tail, then make sure he is at a fair distance, or he'll just walk through it. And while not certain, we think Fat Molded vomit can detonate a tripmine, so use it with caution - but it is great injuring the the two together on round four if they are bunched up.
Remember the essentials of combat
As explained in our Resident Evil 7 tips page, though combat is fairly simple there are some nuances to learn. Aim for the head at all times, block whenever you see an attack coming to greatly lower its damage, use the 180 degree turn (down and B on Xbox / Circle on PlayStation) to flee quickly, and remember you can reload and use health while sprinting.
Another tip is while you'll be wanting to purchase health and weapon upgrades when you have some spare change, but to also always have a decent number of Scrap on you at all times so you can buy an emergency top up of Ammo or Med Kits. You'll be surprised at how fast go down if enemies spawn around you at the wrong time, and there's nothing worse than limping back to the workbench with nothing to defend yourself with.
3. Resident Evil 7 Biohazard : DLC - Daughters


3. Resident Evil 7 Biohazard : DLC - Daughters
The Resident Evil 7 Daughters DLC is part of Banned Footage Vol. 2, a second wave of expansions for the horror adventure game.
While other DLC episodes have centered around Clancy, this is a prequel to the main story, seeing how the Baker Family encountered Eveline for the first time, and as such, is filled with some spoilers you're best to avoid until you've completed the game.
There are two endings to discover, with the 'True Ending' require a specific set of additional steps in order to complete, not unlike the pre-release demo (though not nearly as convoluted). We recommend playing through the Bad Ending first to get a feel for the general flow of the episode, especially since there are Trophies for both, before jumping into the True Ending.
Resident Evil 7 DLC Daughters walkthrough for the Bad Ending
After the opening cutscene in the Dining Area, head to the Laundry Room and grab the Change of Clothes from the table on the far end of the wall. Head up to the Kid's Room in 2F and approach the bed.
Now, play the episode as you would normally. After approaching the bed in the Kid's Room, press the right trigger / R2 to use your Lighter, and head out of the room. Head downstairs to the Dining Room and check on Lucas, then return upstairs to the Bathroom for a cutscene with Jack and Marguerite.
Head to the Garage, grab the Rope as soon as you enter, then back up to the Bathroom again, where Jack will start pursuing you.
Sprint down the corridor, into the Recreation Room, and close the door behind you. Use the Rope to lock the door, then head into the side-room (known as Grandma's Room in the full game) and get the Fork from the table.
Use that on the loose nails sticking out of the plank of wood across the window in the north west corner of the main Recreation Room to escape.
How evade Marguerite and get the Bad Ending
Head east down the passage and pull open the sheet of metal, and wait for Jack to drag Lucas into the Kid's Room, and head into the Main Hall.
Marguerite will be patrolling in the Main Hall, and you must evade her and reach the locked doors on the west side on 1F that leads back to the Dining Room and Garage.
Turn the Lighter off with the right trigger / R2 and wait until Margurite is away from that door and looking away - maybe when she's investigating the south-most alcove, where you find the Shotgun in the main game - then crouch and slowly move your way there. As soon as you unlock it, you'll get a cutscene and receive the Car Key.
Make your way to the Garage along the corridor, but beware Jack will ambush you as soon as you turn the corner by the Laundry Room. Instead, sprint into the Laundry Room, go into the crawl space to arrive into the Pantry. You can collect a Lockpick on the way to open a drawer with a Broken Bottle in the Pantry, which can be used in defence against Jack - but isn't essential.
Now, sneak past Jack, who is patrolling the corridor between the Garage and Laundry Room. If you wait in the Dining Room, along the wall between the two doors, he will walk back and forth. When his back is turned, sneak through to the Garage, and press the button to enter, and approach the car door. Enjoy the ending!
How to get the True Ending in Resident Evil 7 Daughters DLC
To get the Good Ending, you have to perform a number of steps on top of the above Bad Ending steps throughout the episode. We go through the process step-by-step below, or you can watch the following video for a full walkthrough.
After the opening cutscene, stand over Lucas as he sits at the table, and observe his phone screen and remember the pin code he enters - 1019.
Next, head to the Laundry Room and grab the Change of Clothes as usual. However, you'll also want to drop down into the crawl space, where you'll find a Lockpick at the end, just before the Pantry. You may find it easier to run to the Pantry and drop down - whatever works for you.
With the Lockpick in hand, head to 2F, taking the stairs between the Garage and Laundry Room, and into the Bathroom. Use the Lockpick on the locked drawer in here to get the Small Component.
Head to the Kid's Room, and before you hand over the Change of Clothes to Eveline, investigate the trophy on the right as you enter and use the Small Component to access the Attic.
Climb up, and investigate the computer on the far wall, and input the pin code Lucas used on his phone earlier - 1019. Read the note, giving you a hint of where to find a key item inside a red toolbox later. This is required to open it; if you don't read this note, it'll remain closed.
Now, play the episode as you would normally. After approaching the bed in the Kid's Room, press the right trigger / R2 to use your Lighter, and head out of the room. Head downstairs to the Dining Room and check on Lucas, then return upstairs to the Bathroom for a cutscene with Jack and Marguerite. Head to the Garage, grab the Rope as soon as you enter, then back up to the Bathroom again, where Jack will start pursuing you.
Sprint down the corridor, into the Recreation Room, and close the door behind you. Use the Rope to lock the door, then head into the side-room (known as Grandma's Room in the full game) and get the Fork from the table.
Use that on the loose nails sticking out of the plank of wood across the window in the north west corner of the main Recreation Room to escape.
How to escape the Main House and get the True Ending
Once you leave the Recreation Room, before going east and pulling away the sheet of metal, you can crawl through the passage at the end, where there will be a red toolbox. If you accessed the computer in the Attic, it can be opened, to find the Dog Head Relief.
Source : https://en.wikipedia.org/wiki/Resident_Evil_7:_Biohazard
http://whatculture.com/gaming/resident-evil-7-10-facts-secrets-easter-eggs-you-totally-missed?page=6
http://whatculture.com/gaming/resident-evil-7-10-facts-secrets-easter-eggs-you-totally-missed?page=6
https://www.primagames.com/games/resident-evil-7-biohazard/coverage/resident-evil-7-guide-and-walkthrough-all-collectibles-secrets
https://www.primagames.com/games/resident-evil-7-biohazard/tips/resident-evil-7-all-antique-coin-locations
http://twinfinite.net/2017/01/resident-evil-7-magnum-how-to-get/
https://www.primagames.com/games/resident-evil-7-biohazard/tips/resident-evil-7-how-get-m21-shotgun
http://www.ign.com/wikis/resident-evil-7/Bedroom
http://www.eurogamer.net/articles/2017-02-21-resident-evil-7-daughters-dlc-true-ending-bad-ending-4298
http://www.eurogamer.net/articles/2017-02-21-resident-evil-7-nightmare-dlc-beat-every-wave-easy-scrap-rewards-4298
Tidak ada komentar:
Posting Komentar